
この記事では Java 17 で SVG を書く方法について説明します。
Java で svg を書く手段なんていくらでも記事があるだろうと思っていましたが、10年以上前の記事が多く、最近の記事はほとんどないことに驚きました。
結論から言うと、その当時の方法を使う、にはなるのですが、Java 17 で動かした内容をまとめます。
Java で SVG を記述するには、Apache Batik を利用することで簡単に実現できます。
なお、svg を扱う他の手段として、他には jfreesvg というものもあり、こちらのほうが最近でも継続して開発はされているようですが、組織ではなく個人のようですね。
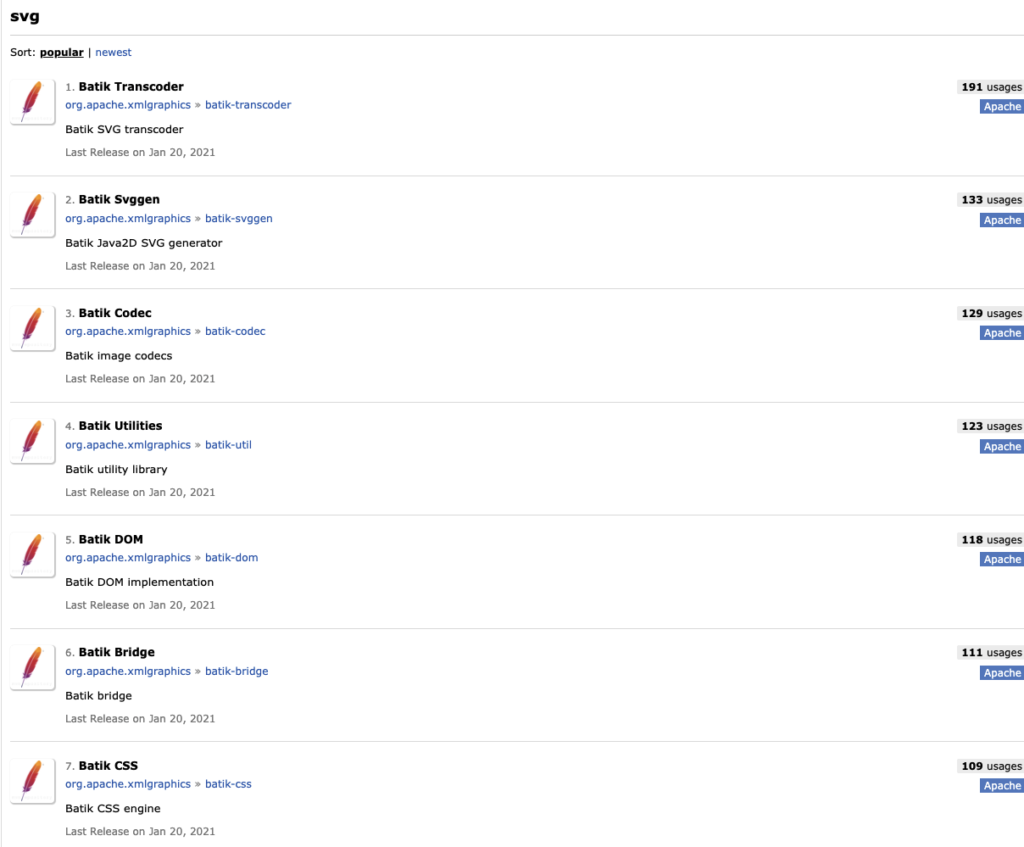
また、maven の popular でも確認してみましたが、svg のタグで見ると、Batik 系がもっとも利用されているという結果です(2022/8時点)。そのため、今でも Batik が第一候補になるのかなと思っています。
Apache Batik とは?
Apache Batik は、SVGフォーマット画像を表示,生成および加工するためのライブラリで、2022/8 時点では、バージョン 1.14 が最新(2021/1/20 リリース)です。
- SVG 操作(新規作成、ファイルからの作成)
- SVG の JPEG や PNG 変換
が出来ることに加えて、ライブラリ自体はかなり昔からあるようで、GUIに関するツールなども提供しているようです(このご時世で、もう使うことはないでしょうが)。
- SVG のレンダリング(Swingを使用)
- ブラウザ(Squiggleというそうです)
今回は、Java で GUI を使うわけではなく、あくまで SVG を作成し、ファイルとして生成するところまでをターゲットとしています。
なお、Apache Batik が対応している SVG 仕様については こちら のページに記載されています。
SVG 1.1 に関しては大部分がサポートされているようですが、未サポートもあるようです。
また、SVG 1.1 以降に関しては記述自体がないので、更新頻度的に考えると未サポートかと思われます(未確認です)。
Apache Batik での SVG 作成方法
DOM API を使用するか、SVGGraphics2D を使用するかのいずれかで作成できます。
違いは、以下の図が分かりやすいです。
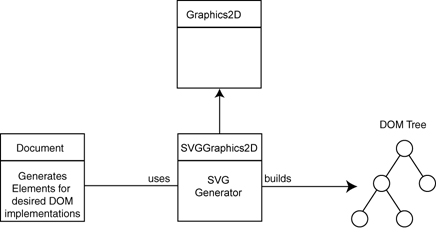
Document は org.w3c.dom.Document であり、前者はこちらに対して DOM(Document Object Model)操作を直接やる方法です。svg は xml なので、1つ1つの要素を DOM API を使って作っていくイメージです。
後者も同じく Document を使用するのですが、図形を描画したり、色やテキスト、レイアウトといったものを扱う Graphics2D クラスを拡張した SVGGraphics2D を経由して SVG を作成します。
ざっくり自分の理解では、ベタにタグ要素と属性を設定していきたい場合は前者、長方形が作りたい(drawRect メソッド)、などそれらをラッパーされた関数経由で作成できるのが後者、です。
(上記の図は分かりやすいのですが、公式のサイトだとイメージが正しく表示されていないようです)
本記事では、それぞれの方法で svg を作成してみます。
書いていてどちらかにすべき!とは思えないので、作りたいケースに応じた方法でいいなと思います。
DOM API を使用して svg を作成する
以下、SVG を描画してファイルに保存する処理です。
Batik が提供する SVGDOMImplementation を用いて Document のインスタンスを生成します。
以降は、createElementNS で指定した要素タグを作成し、setAttributeNS で任意の属性値を設定していきます。これだけで svg が作成できます。
出力も、Apache Batik の Transcoder を利用することで可能です。
import org.apache.batik.anim.dom.SVGDOMImplementation;
import org.apache.batik.transcoder.TranscoderException;
import org.apache.batik.transcoder.TranscoderInput;
import org.apache.batik.transcoder.TranscoderOutput;
import org.apache.batik.transcoder.svg2svg.SVGTranscoder;
import org.w3c.dom.DOMImplementation;
import org.w3c.dom.Document;
import org.w3c.dom.Element;

import java.io.*;
import java.nio.charset.StandardCharsets;

public class CreateSvgWithDomApi {
    public static void main(String[] args) throws Exception {
        createSVG();
    }

    private static void createSVG() throws IOException, TranscoderException {
        String svgNS = SVGDOMImplementation.SVG_NAMESPACE_URI;
        DOMImplementation impl = SVGDOMImplementation.getDOMImplementation();
        Document doc = impl.createDocument(svgNS, "svg", null);

        // ルートを定義, ルートの属性を設定
        Element svgRoot = doc.getDocumentElement();
        svgRoot.setAttributeNS(null, "width", "800");
        svgRoot.setAttributeNS(null, "height", "800");

        // 矩形要素と属性を生成
        // ここで作りたい svg 要素を作成していきます
        Element rectangle = doc.createElementNS(svgNS, "rect");
        rectangle.setAttributeNS(null, "width", "100");
        rectangle.setAttributeNS(null, "height", "50");

        // ルートに追加
        svgRoot.appendChild(rectangle);

        // Document をファイルに保存します
        TranscoderInput input = new TranscoderInput(doc);
        File file = new File("sample.svg");
        SVGTranscoder t = new SVGTranscoder();
        try (OutputStream os = new FileOutputStream(file)) {
            OutputStreamWriter writer = new OutputStreamWriter(os, StandardCharsets.UTF_8);
            TranscoderOutput output = new TranscoderOutput(writer);
            t.transcode(input, output);
        }
    }
}
出力されたファイル sample.svg の中身は以下となります。
<svg contentScriptType="text/ecmascript" width="400"
     xmlns:xlink="http://www.w3.org/1999/xlink" zoomAndPan="magnify"
     contentStyleType="text/css" height="450"
     preserveAspectRatio="xMidYMid meet" xmlns="http://www.w3.org/2000/svg"
     version="1.0">
    <rect width="100" height="50" />
</svg>
作業をしていると、以下のエラーが発生する場合があります
(試した環境によっては発生しなかった場合もあります)。
パッケージ org.w3c.dom は複数のモジュールからアクセスできます:<unnamed>、Java.xml原因としては、同一のパッケージが複数のモジュールに含まれている場合に発生するようです。Stack Overflow によると、重複しているパッケージを除外することで解決できます。
今回の場合、xml-apis が該当するため、以下のようにします。mvn dependencies:tree で依存関係にあるパッケージが確認できるので、そのあたりも解消するときには参考になります。
<dependency>
    <groupId>org.apache.xmlgraphics</groupId>
    <artifactId>batik-all</artifactId>
    <version>1.14</version>
    <type>pom</type>
</dependency>
<dependency>
    <groupId>org.apache.xmlgraphics</groupId>
    <artifactId>batik-dom</artifactId>
    <version>1.14</version>
    <exclusions>
        <exclusion>
            <groupId>xml-apis</groupId>
            <artifactId>xml-apis</artifactId>
        </exclusion>
    </exclusions>
</dependency>
DOM API を利用する場合は、SVG の要素と属性をそのまま追加していくことで作れます。SVG の細かい書き方はすでにたくさん記事があるのでそちらにゆずり、Java での実装例を記載します。
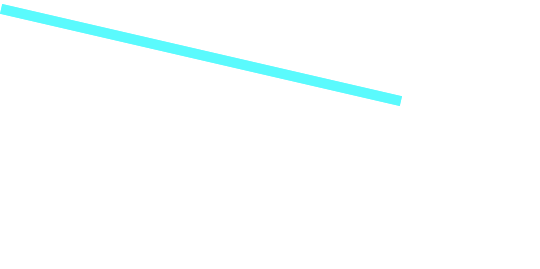
線
        // 線
        Element line = doc.createElementNS(svgNS, "line");
        line.setAttributeNS(null, "x1", "10");
        line.setAttributeNS(null, "y1", "200");
        line.setAttributeNS(null, "x2", "400");
        line.setAttributeNS(null, "y2", "0");
        line.setAttributeNS(null, "stroke", "aqua");
        line.setAttributeNS(null, "stroke-width", "2");
        svgRoot.appendChild(line);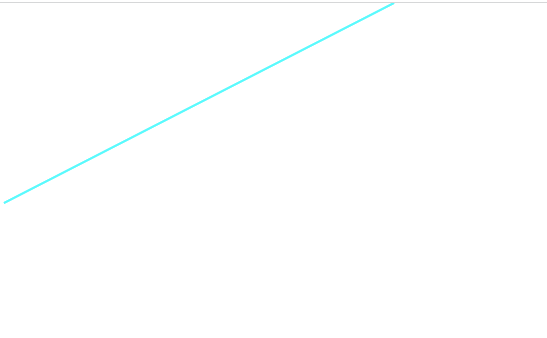
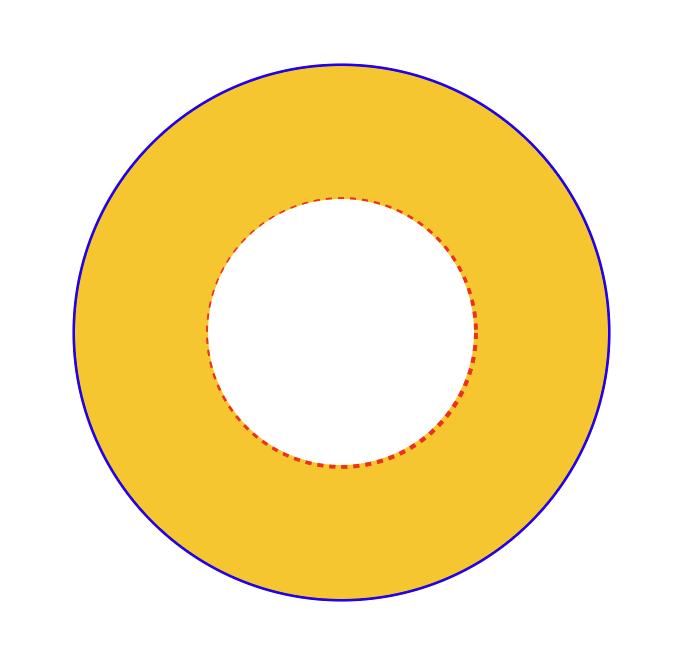
円
        // 外側の円
        Element circle1 = doc.createElementNS(svgNS, "circle");
        circle1.setAttributeNS(null, "cx", "100");
        circle1.setAttributeNS(null, "cy", "200");
        circle1.setAttributeNS(null, "r", "100");
        circle1.setAttributeNS(null, "stroke", "blue");
        circle1.setAttributeNS(null, "stroke-width", "2");
        circle1.setAttributeNS(null, "fill", "orange");
        svgRoot.appendChild(circle1);

        // 内側の円
        Element circle2 = doc.createElementNS(svgNS, "circle");
        circle2.setAttributeNS(null, "cx", "100");
        circle2.setAttributeNS(null, "cy", "200");
        circle2.setAttributeNS(null, "r", "50");
        circle2.setAttributeNS(null, "fill", "#fff");
        circle2.setAttributeNS(null, "stroke", "red");
        circle2.setAttributeNS(null, "stroke-dasharray", "4 4"); // 点線
        svgRoot.appendChild(circle2);
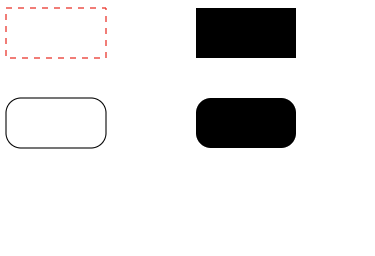
長方形
        // 長方形
        Element rect1 = doc.createElementNS(svgNS, "rect");
        rect1.setAttributeNS(null, "x", "10");
        rect1.setAttributeNS(null, "y", "20");
        rect1.setAttributeNS(null, "width", "100");
        rect1.setAttributeNS(null, "height", "50");
        rect1.setAttributeNS(null, "rx", "20");  // 角丸
        rect1.setAttributeNS(null, "ry", "20");  // 角丸
        svgRoot.appendChild(rect1);

        Element rect2 = doc.createElementNS(svgNS, "rect");
        rect2.setAttributeNS(null, "x", "200");
        rect2.setAttributeNS(null, "y", "20");
        rect2.setAttributeNS(null, "width", "100");
        rect2.setAttributeNS(null, "height", "50");
        rect2.setAttributeNS(null, "fill", "#fff");
        rect2.setAttributeNS(null, "stroke", "red");
        rect2.setAttributeNS(null, "stroke-dasharray", "4 4");
        svgRoot.appendChild(rect2);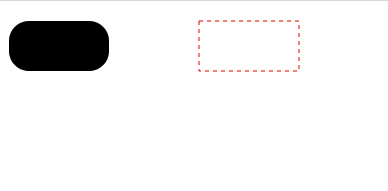
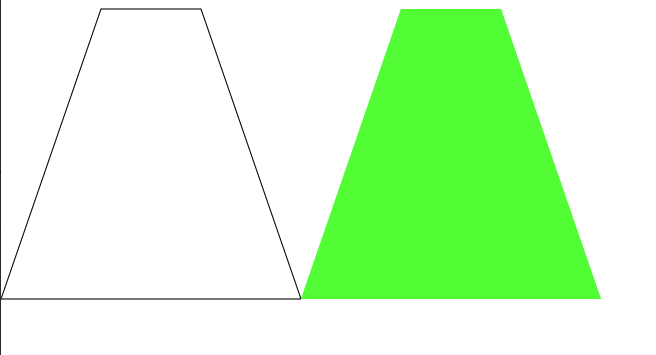
多角形(polygon)
        // 台形
        Element polygon = doc.createElementNS(svgNS, "polygon");
        polygon.setAttributeNS(null, "fill", "lime");
        // points 属性で (x, y) の組み合わせを順番に記載
        // 以下は (100, 10), (200, 10), (300, 300), (0, 300) の点を結ぶ
        polygon.setAttributeNS(null, "points", " 100 10 200 10 300 300 0 300");
        svgRoot.appendChild(polygon);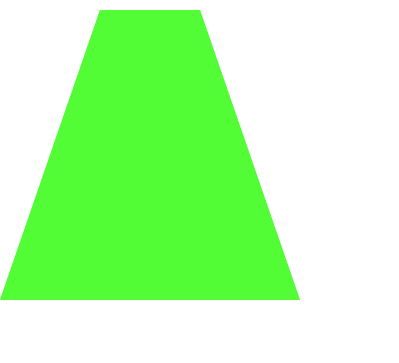
文字列
        Element text = doc.createElementNS(svgNS, "text");
        text.setAttributeNS(null, "x", "10");
        text.setAttributeNS(null, "y", "100");
        text.setAttributeNS(null, "font-size", "24");
        text.setAttributeNS(null, "fill", "red");
        text.setTextContent("テスト文字列");
        svgRoot.appendChild(text);
SVGGraphics2D を使用して svg を作成する
次はもう1つの書き方です。
DOM API と近い図形を書いてみましたが、逆に書くのが難しくなった感もあります・・・ただ構文を知らないだけ、というのもありますが。
例えば1つの doc の中に複数の図形を描画するときなどは、処理の記述の順番も結果に影響しますので注意が必要です。
直線
import java.awt.*;
import java.awt.geom.Ellipse2D;
import java.io.IOException;
import org.w3c.dom.DOMImplementation;

import org.apache.batik.anim.dom.SVGDOMImplementation;
import org.apache.batik.svggen.SVGGraphics2D;

public class CreateSvg {

    public static void main(String[] args) throws Exception {
        createSVG();
    }

    private static void createSVG() throws IOException {
        // ドキュメントを作るところは同じです
        String svgNS = SVGDOMImplementation.SVG_NAMESPACE_URI;
        DOMImplementation impl = SVGDOMImplementation.getDOMImplementation();
        Document doc = impl.createDocument(svgNS, "svg", null);

        // doc から SVGGraphics2D を生成しつつ、svg のサイズを指定します
        SVGGraphics2D g1 = new SVGGraphics2D(doc);
        g1.setSVGCanvasSize(new Dimension(800, 800));

        // 自由に描画します
        draw1(g1);

        // SVGGraphics2D の実装により、これだけで svg ファイルが出力できます
        g1.stream("test1.svg");
        g1.dispose();
    }

    // 直線
    private static void draw1(Graphics2D g) {
        // 色
        g.setPaint(Color.CYAN);
        // 太さ
        g.setStroke(new BasicStroke(10));
        // x1 – 座標 x 開始位置
        // y1 – 座標 y 開始位置
        // x2 – 座標 x 終了位置
        // y2 – 座標 y 終了位置
        g.drawLine(10, 10, 400, 100);
    }
}
SVGGraphics2D利用)円
    private static void draw2(Graphics2D g) {
        double w = 800;
        double h = 800;

        // 外枠
        g.setPaint(Color.BLUE);
        g.setStroke(new BasicStroke(5));
        g.draw(new Ellipse2D.Double((int) w / 6, (int) h / 6, (int) (2 * w) / 3, (int) (2 * h) / 3));

        // 外縁
        g.setPaint(Color.ORANGE);
        // 塗りつぶしの円
        // x – 矩形の左上端の x 座標
        // y – 矩形の左上端の y 座標
        // w – 矩形の幅
        // h – 矩形の高さ
        g.fillOval((int) w / 6, (int) h / 6, (int) (2 * w) / 3, (int) (2 * h) / 3);

        // 内枠 - 破線にする
        g.setColor(Color.RED);
        g.setStroke(new BasicStroke(5, BasicStroke.CAP_BUTT, BasicStroke.JOIN_BEVEL, 1.0f, new float[] {6}, 0));
        // 塗りつぶしなしの円
        // x – 矩形の左上端の x 座標
        // y – 矩形の左上端の y 座標
        // w – 矩形の幅
        // h – 矩形の高さ
        g.draw(new Ellipse2D.Double(w / 3, w / 3, w / 3, h / 3));

        // 中央の白円
        g.setPaint(Color.WHITE);
        g.fillOval((int) w / 3, (int) w / 3, (int) w / 3, (int) h / 3);
    }
SVGGraphics2D利用)長方形
    private static void draw3(Graphics2D g) {
        // 塗りつぶしなしの長方形
        // x – 描画する x 座標
        // y – 描画数r y 座標
        // w – 矩形の幅
        // h – 矩形の高さ
        // 枠線を破線にする
        g.setColor(Color.RED);
        g.setStroke(new BasicStroke(1, BasicStroke.CAP_BUTT, BasicStroke.JOIN_BEVEL, 1.0f, new float[] {6}, 0));
        g.drawRect(10, 10, 100, 50);

        // 戻す
        g.setColor(Color.BLACK);
        g.setStroke(new BasicStroke(1));
        // 塗りつぶしありの長方形
        g.fillRect(200, 10, 100, 50);

        // 塗りつぶしなしの角丸
        // x – 描画する x 座標
        // y – 描画数r y 座標
        // w – 矩形の幅
        // h – 矩形の高さ
        // arcWidth - 四隅の 円弧の水平方向の直径
        // arcHeight - 四隅の 円弧の垂直方向の直径
        g.drawRoundRect(10, 100, 100, 50, 30, 30);

        // 塗りつぶしありの角丸
        g.fillRoundRect(200, 100, 100, 50, 30, 30);
    }
SVGGraphics2D利用)Polygon
    private static void draw4(Graphics2D g) {
        // (100, 10), (200, 10), (300, 300), (0, 300) の 4 座標
        int xPoints[] = {100, 200, 300, 0};
        int yPoints[] = {10, 10, 300, 300};
        // xPoints - x 座標の配列
        // yPoints - y 座標の配列
        // nPoints - 点の数
        g.drawPolygon(xPoints, yPoints, 4);

        // 塗りつぶしあり
        int xPoints2[] = {400, 500, 600, 300};
        int yPoints2[] = {10, 10, 300, 300};
        g.setColor(Color.green);
        g.fillPolygon(xPoints2, yPoints2, 4);

        // フォントの指定
        g.setFont(new Font("TimesRoman", Font.PLAIN, 48));
    }
SVGGraphics2D利用)まとめ
どちらでも書けますが、とりあえずすぐに書けるのは DOM API ですね、記述の冗長感はありますが。
もっと複雑なことがしたい、という場合には Graphics2D を使って行くのかなと理解しました。


コメント